How To Tie A Tie And Look Good On Any Occasion

Tying a tie looks easy. However, as soon as he tries for himself, he realizes that tying a tie is not so simple. Want to learn how to tie ties easily? Here’s a step-by-step guide on how to easily tie a tie to make it look great for any occasion. Take a look at the photos, follow the steps and become a master of this art.
Before you start, you need to know how you want to tie your tie. There are several ways to tie a tie, such as the single knot (which you can imagine is very easy), the double Windsor knot (a little more elegant), the Shelby or Pratt knot (looks like the Windsor knot but is less wide) and the Kent knot (small knot). Once you’re sure which tie you want to tie, you can start!
Advertisement
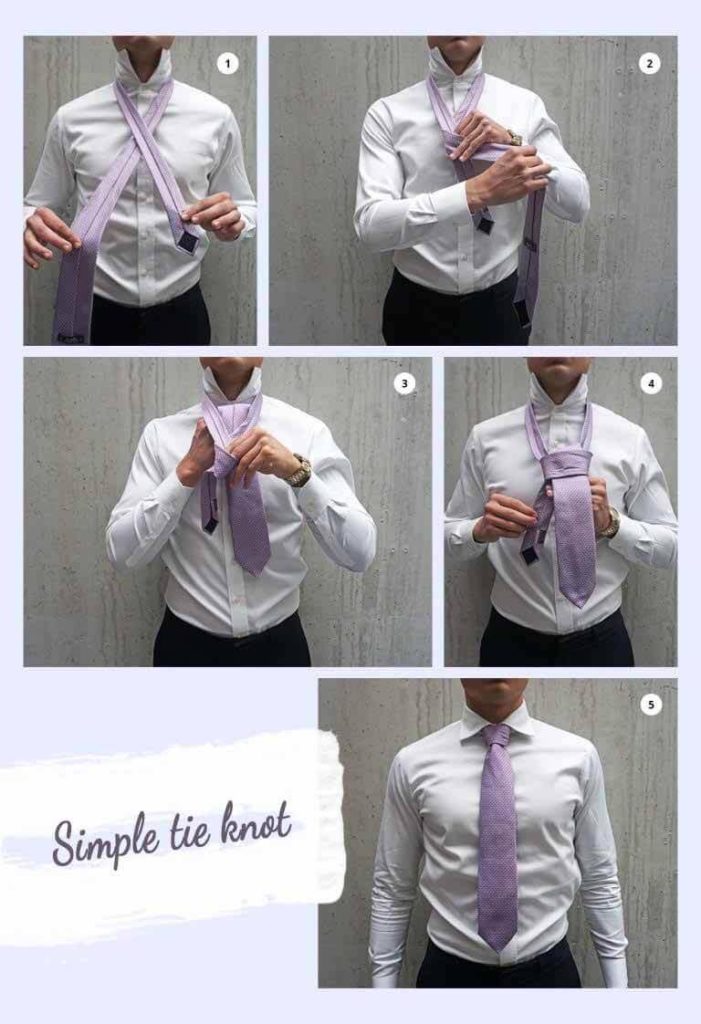
1. The simple tie knot
This knot is as the name suggests: simple. If you want a tie that doesn’t require a lot of effort, then this is your knot!
How to make a simple tie knot:
Step 1: Wrap the tie around your neck with the inside of the tie facing up (upside down) and place the wide end of the tie on the right side and the smaller end of the left side and cross the ends. In terms of length, the wide end should fall just above the navel.
Step 2: Place the wide end on top of the narrow part and hold it at the top.
Step 3: With the wide end secured, pass this part under the other end to pass through the neck cavity.
Step 4: Pass the wide end through the loop made in step 2.
Step 5: Pull the wide end to adjust the tie and voila, made your simple knot.

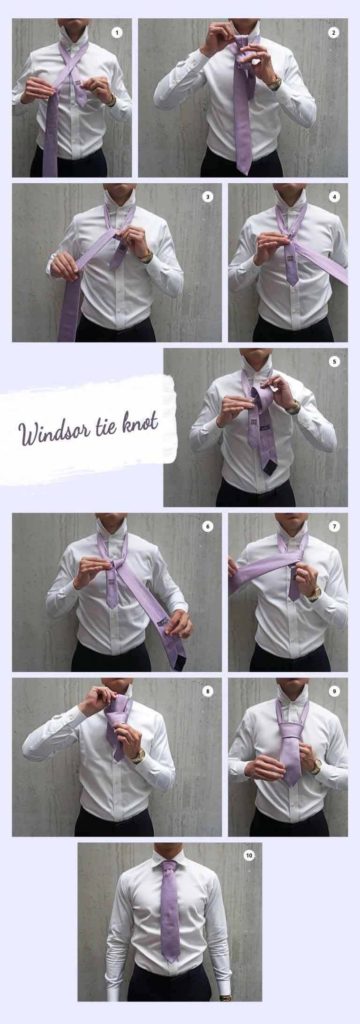
2. The Windsor Tie Knot
The Windsor knot is a slightly thicker knot, radiating self-confidence. So, it’s the perfect knot for important meetings or when you have a presentation. Here are the steps to making a double Windsor knot:
How to Tie a Windsor Tie:
Step 1: Place the tie around your neck, this time with the outside up. The thinnest end is on the right and the wider end is on the left. Then cross the smaller end under the larger end.
Step 2: Tie the wide end into a loop, passing through the neck opening.
Step 3: Lower the wider end.
Step 4: Move the wide end to the left.
Step 5: Pass the wide end through the neck opening.
Step 6: Release the widest side of the bow on the left.
Step 7: Next, rotate the larger end over the smaller end.
Step 8: Pull the wider end through the neck opening again.
Step 9: Take the wider side of the loop and you’re done; you’ve got your double Windsor knot!

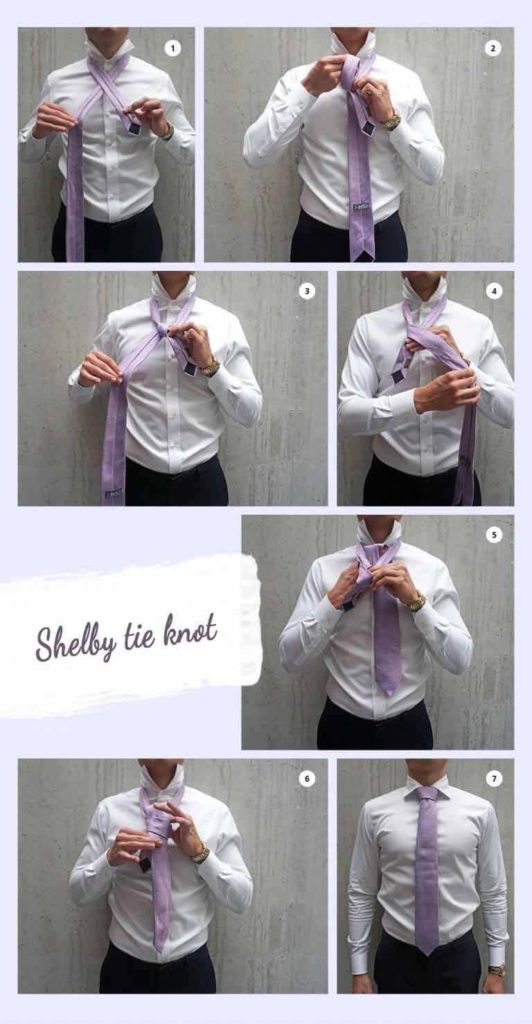
3. The Shelby or Pratt tie knot
If you’re looking for a way to tie your tie that matches shirts with a slightly wider collar, this is your knot! Here are the steps for the Shelby or Pratt knot:
How to Tie a Shelby or Pratt Knot:
Step 1: Place the tie around your neck, with the inside facing up. The thin end, which is on the right, crosses the wide end.
Step 2: Grasp the thin end and pull the wide end through the neck opening.
Step 3: Let the wide end come out on the right with the inside facing up.
Step 4: Bring the wide end to the left above.
Step 5: Then pull the wide end through the neck opening again.
Step 6: and finally pass the wide end through the central knot. There’s your Shelby or Pratt knot.

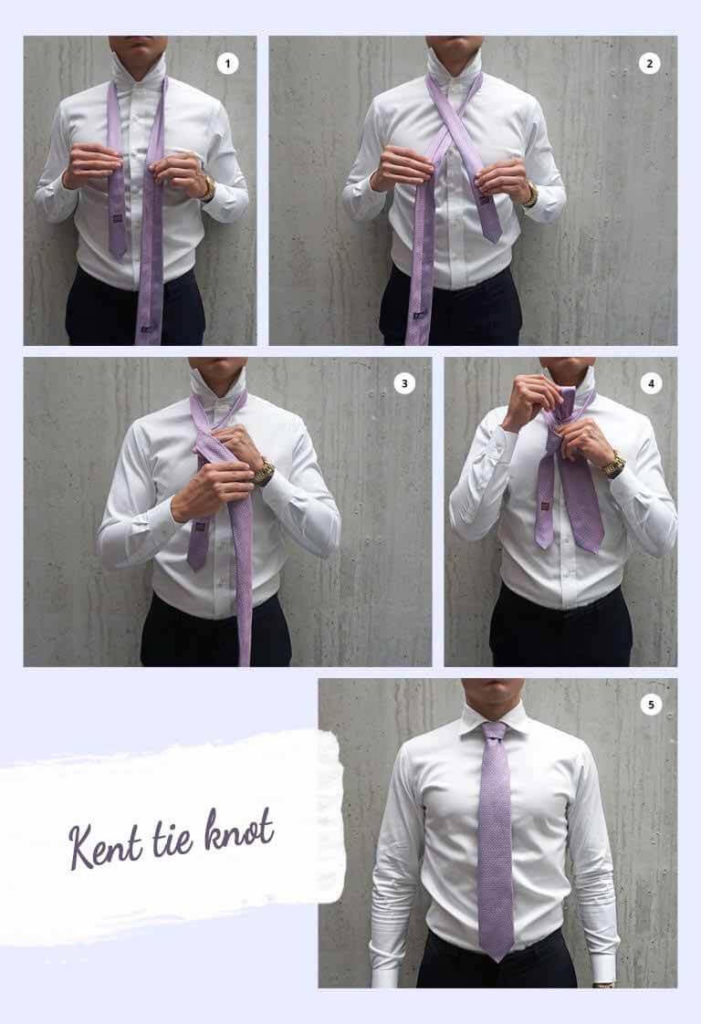
4. The Kent Tie Knot
The Kent Knot is a smaller tie knot that gives a contemporary and more casual look. See how it’s done:
How to Tie a Kent Knot or Small Knot:
Step 1: Place the tie around your neck with the outside facing up. The thin tip on the right. Now turn the inside of the wide end up so that only the smooth side will be visible at the back of the neck.
Step 2: Cross the thin end with the wide end.
Step 3: Next, pass the wide end of the tie over the narrow side, leaving the smooth part of the wide end visible.
Step 4: Pass the wider end through the neck strap and you will have the Kent knot. It was easy right?

Did you liked this post? Leave us a comment below!
Advertisement
Afflictions
The psalmist once said, “It is good that I have...
How Often Should You Clean The House? The Expert Answer
Cleaning the house is a must-have task, but many wonder...
How To Dye Your Eyebrows With Coffee And Cocoa
Here are all the steps to coloring your eyebrows with...
Salt For Cleaning, How To Really Use It Better
As with many substances of natural origin, salt, for cleaning,...
Advertisement
- All
- Family Worship
- Games
- Health & Beauty
- Illustrations
- News

Family Worship – tip 9

The Snake, the Bird and the Buffalo

Who Am I

Armageddon Seen From Two Angles

Family Worship – tip 13

Always Advance, In a Straight Line

Why Do People Scream?

How Often Should You Clean The House? The Expert Answer

Family Worship – tip 15

Caleb’s Run

1-Year Family Worship Plan


